目前的迁移学习太粗浅, 归因于我们对表征的理解太粗浅. 但这是一个好方向, 如果我们能从”迁移学习”上升到”继承学习”, 任何模型都是”可继承”的, 不用担心今天的模型到了明天就毫无用处, 就像人类的基因一代代地演变, 是不是会有点意思 ? — David 9
太多初学者总是混淆迁移学习和预训练模型, David 9一直想为大家区分两者, 其实迁移学习和预训练并不难区分:
- 把模型的所有参数保存起来, 都可以宽泛地叫做预训练, 所以预训练比迁移学习宽泛的多. 我们并不设限预训练的保存模型未来的用处 (部署 or 继续优化 or 迁移学习)
- 把预训练的模型用在其他应用的训练可以称为迁移学习.
迁移学习(Transfer learning) 的原理相当简单:
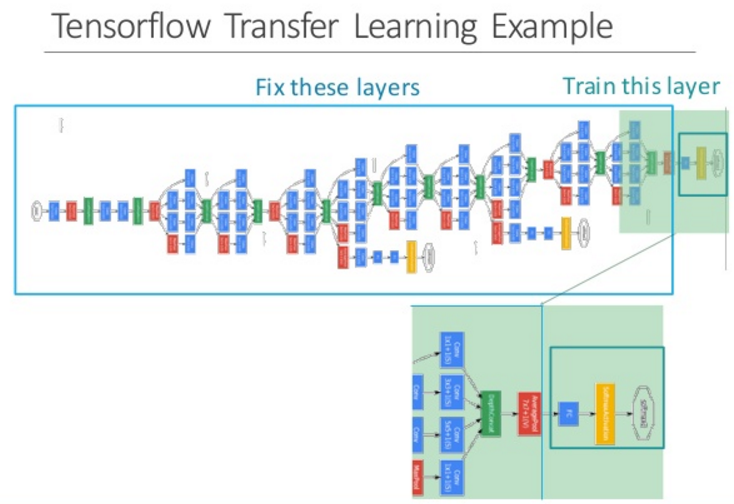
 如上图, 复用之前预训练的复杂深度网络(第一行大蓝框), 我们复用倒数第二层对图像的输出特征作为新的训练输入.
使用这个输入, 我们再训练一个迷你的浅层网络(第二行绿底网络), 就可以应用在其他领域.
明眼的你应该已经看出, 本质上, 迁移学习使用的是之前深度网络做特征提取, 使用在其他领域. 实际训练步骤是以下两步:
- 用之前预训练的网络对所有当前训练图片提取特征(这些图片是新的领域问题), 把所有图片对应的特征存储起来, 作为新的训练输入
- 构造一个新的浅层网络, 使用第一步中得到的训练输入, 训练新的网络, 得到结果.
tensorflow官网就有一个很实际的代码例子, 使用预训练的imagenet 的inception v3模型做特征提取, 最后应用在对花朵种类的判断.
好处是训练时间大大降低(特征提取时间+浅层网络训练时间), 坏处是训练准确率和泛化能力得不到保证.
作为一种先进的特征提取方法, 我们还是有必要学习一下, 跑一跑, 并分析一下这段代码.
首先下载花朵的训练图片集:
cd ~
curl -O http://download.tensorflow.org/example_images/flower_photos.tgz
tar xzf flower_photos.tgz
然后跑一下例程代码:
python retrain.py --image_dir ./flower_photos
最后可以达到90%左右的准确率:
INFO:tensorflow:2017-07-22 10:05:09.260903: Step 3890: Cross entropy = 0.198248
INFO:tensorflow:2017-07-22 10:05:09.312824: Step 3890: Validation accuracy = 94.0% (N=100)
INFO:tensorflow:2017-07-22 10:05:09.820118: Step 3900: Train accuracy = 97.0%
INFO:tensorflow:2017-07-22 10:05:09.820256: Step 3900: Cross entropy = 0.154597
INFO:tensorflow:2017-07-22 10:05:09.869922: Step 3900: Validation accuracy = 91.0% (N=100)
INFO:tensorflow:2017-07-22 10:05:10.399266: Step 3910: Train accuracy = 97.0%
INFO:tensorflow:2017-07-22 10:05:10.399414: Step 3910: Cross entropy = 0.093788
INFO:tensorflow:2017-07-22 10:05:10.453158: Step 3910: Validation accuracy = 93.0% (N=100)
INFO:tensorflow:2017-07-22 10:05:10.956997: Step 3920: Train accuracy = 97.0%
INFO:tensorflow:2017-07-22 10:05:10.957138: Step 3920: Cross entropy = 0.122813
INFO:tensorflow:2017-07-22 10:05:11.007604: Step 3920: Validation accuracy = 89.0% (N=100)
INFO:tensorflow:2017-07-22 10:05:11.522091: Step 3930: Train accuracy = 95.0%
INFO:tensorflow:2017-07-22 10:05:11.522232: Step 3930: Cross entropy = 0.159994
INFO:tensorflow:2017-07-22 10:05:11.570859: Step 3930: Validation accuracy = 92.0% (N=100)
INFO:tensorflow:2017-07-22 10:05:12.080420: Step 3940: Train accuracy = 96.0%
INFO:tensorflow:2017-07-22 10:05:12.080564: Step 3940: Cross entropy = 0.221738
INFO:tensorflow:2017-07-22 10:05:12.134537: Step 3940: Validation accuracy = 92.0% (N=100)
INFO:tensorflow:2017-07-22 10:05:12.642243: Step 3950: Train accuracy = 97.0%
INFO:tensorflow:2017-07-22 10:05:12.642383: Step 3950: Cross entropy = 0.158361
INFO:tensorflow:2017-07-22 10:05:12.691931: Step 3950: Validation accuracy = 90.0% (N=100)
INFO:tensorflow:2017-07-22 10:05:13.214241: Step 3960: Train accuracy = 96.0%
INFO:tensorflow:2017-07-22 10:05:13.214386: Step 3960: Cross entropy = 0.158029
INFO:tensorflow:2017-07-22 10:05:13.268484: Step 3960: Validation accuracy = 90.0% (N=100)
INFO:tensorflow:2017-07-22 10:05:13.770428: Step 3970: Train accuracy = 99.0%
INFO:tensorflow:2017-07-22 10:05:13.770575: Step 3970: Cross entropy = 0.099293
INFO:tensorflow:2017-07-22 10:05:13.823418: Step 3970: Validation accuracy = 96.0% (N=100)
INFO:tensorflow:2017-07-22 10:05:14.359288: Step 3980: Train accuracy = 98.0%
INFO:tensorflow:2017-07-22 10:05:14.359482: Step 3980: Cross entropy = 0.118389
INFO:tensorflow:2017-07-22 10:05:14.415409: Step 3980: Validation accuracy = 90.0% (N=100)
INFO:tensorflow:2017-07-22 10:05:14.920159: Step 3990: Train accuracy = 95.0%
INFO:tensorflow:2017-07-22 10:05:14.920319: Step 3990: Cross entropy = 0.186348
INFO:tensorflow:2017-07-22 10:05:14.972052: Step 3990: Validation accuracy = 89.0% (N=100)
INFO:tensorflow:2017-07-22 10:05:15.420504: Step 3999: Train accuracy = 96.0%
INFO:tensorflow:2017-07-22 10:05:15.420646: Step 3999: Cross entropy = 0.178720
INFO:tensorflow:2017-07-22 10:05:15.470483: Step 3999: Validation accuracy = 94.0% (N=100)
INFO:tensorflow:Final test accuracy = 91.5% (N=353)
INFO:tensorflow:Froze 2 variables.
Converted 2 variables to const ops.
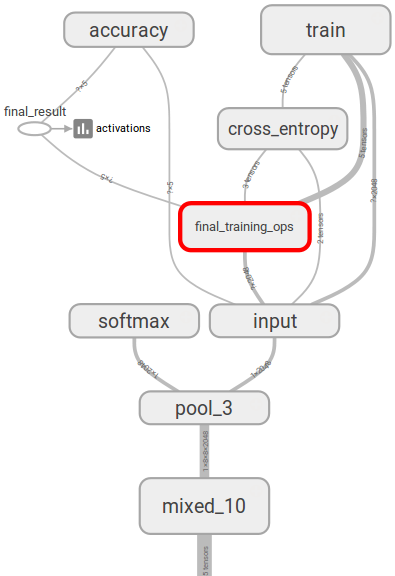
仅仅用笔记本cpu训练就足够了. 因为只是训练了一层浅层网(final_training_ops)而已:
对应代码分析, 最主要的是如下两处:
- 用预训练的模型提取训练图片的对应特征:
def run_bottleneck_on_image(sess, image_data, image_data_tensor,
                            decoded_image_tensor, resized_input_tensor,
                            bottleneck_tensor):
  """Runs inference on an image to extract the 'bottleneck' summary layer.
  Args:
    sess: Current active TensorFlow Session.
    image_data: String of raw JPEG data.
    image_data_tensor: Input data layer in the graph.
    decoded_image_tensor: Output of initial image resizing and  preprocessing.
    resized_input_tensor: The input node of the recognition graph.
    bottleneck_tensor: Layer before the final softmax.
  Returns:
    Numpy array of bottleneck values.
  """
  # First decode the JPEG image, resize it, and rescale the pixel values.
  resized_input_values = sess.run(decoded_image_tensor,
                                  {image_data_tensor: image_data})
  # Then run it through the recognition network.
  bottleneck_values = sess.run(bottleneck_tensor,
                               {resized_input_tensor: resized_input_values})
  bottleneck_values = np.squeeze(bottleneck_values)
  return bottleneck_values
返回的bottleneck_values这个Tensor就是最后一层输出的特征图.
2. 利用步骤1中提取的特征, 为了进行新的训练, 构造自己的浅层网络:
def add_final_training_ops(class_count, final_tensor_name, bottleneck_tensor,
                           bottleneck_tensor_size):
  """Adds a new softmax and fully-connected layer for training.
  We need to retrain the top layer to identify our new classes, so this function
  adds the right operations to the graph, along with some variables to hold the
  weights, and then sets up all the gradients for the backward pass.
  The set up for the softmax and fully-connected layers is based on:
  https://www.tensorflow.org/versions/master/tutorials/mnist/beginners/index.html
  Args:
    class_count: Integer of how many categories of things we're trying to
    recognize.
    final_tensor_name: Name string for the new final node that produces results.
    bottleneck_tensor: The output of the main CNN graph.
    bottleneck_tensor_size: How many entries in the bottleneck vector.
  Returns:
    The tensors for the training and cross entropy results, and tensors for the
    bottleneck input and ground truth input.
  """
  with tf.name_scope('input'):
    bottleneck_input = tf.placeholder_with_default(
        bottleneck_tensor,
        shape=[None, bottleneck_tensor_size],
        name='BottleneckInputPlaceholder')

    ground_truth_input = tf.placeholder(tf.float32,
                                        [None, class_count],
                                        name='GroundTruthInput')

  # Organizing the following ops as `final_training_ops` so they're easier
  # to see in TensorBoard
  layer_name = 'final_training_ops'
  with tf.name_scope(layer_name):
    with tf.name_scope('weights'):
      initial_value = tf.truncated_normal(
          [bottleneck_tensor_size, class_count], stddev=0.001)

      layer_weights = tf.Variable(initial_value, name='final_weights')

      variable_summaries(layer_weights)
    with tf.name_scope('biases'):
      layer_biases = tf.Variable(tf.zeros([class_count]), name='final_biases')
      variable_summaries(layer_biases)
    with tf.name_scope('Wx_plus_b'):
      logits = tf.matmul(bottleneck_input, layer_weights) + layer_biases
      tf.summary.histogram('pre_activations', logits)

  final_tensor = tf.nn.softmax(logits, name=final_tensor_name)
  tf.summary.histogram('activations', final_tensor)

  with tf.name_scope('cross_entropy'):
    cross_entropy = tf.nn.softmax_cross_entropy_with_logits(
        labels=ground_truth_input, logits=logits)
    with tf.name_scope('total'):
      cross_entropy_mean = tf.reduce_mean(cross_entropy)
  tf.summary.scalar('cross_entropy', cross_entropy_mean)

  with tf.name_scope('train'):
    optimizer = tf.train.GradientDescentOptimizer(FLAGS.learning_rate)
    train_step = optimizer.minimize(cross_entropy_mean)

  return (train_step, cross_entropy_mean, bottleneck_input, ground_truth_input,
          final_tensor)
可见, 上述只是要训练一个类似全连接的层. 输入就是步骤1中的bottleneck_tensor. 输出就是真实预测了.
参考文献:
- https://www.tensorflow.org/tutorials/image_retraining
- http://vision.stanford.edu/pdf/LiSuXingFeiFeiNIPS2010.pdf
- https://arxiv.org/pdf/1310.1531v1.pdf
本文采用署名 – 非商业性使用 – 禁止演绎 3.0 中国大陆许可协议进行许可。著作权属于“David 9的博客”原创,如需转载,请联系微信: david9ml,或邮箱:yanchao727@gmail.com
或直接扫二维码:
David 9
Latest posts by David 9 (see all)
- 修订特征已经变得切实可行, “特征矫正工程”是否会成为潮流? - 27 3 月, 2024
- 量子计算系列#2 : 量子机器学习与量子深度学习补充资料,QML,QeML,QaML - 29 2 月, 2024
- “现象意识”#2:用白盒的视角研究意识和大脑,会是什么景象?微意识,主体感,超心智,意识中层理论 - 16 2 月, 2024


赞一个
感谢支持 ~