深度学习中对于卷积层的可视化可以帮助理解卷积层的工作原理与训练状态,然而卷积层可视化的方法不只一种。最简单的方法即直接输出卷积核和卷积后的filter通道,成为图片。然而也有一些方法试图通过反卷积(转置卷积)了解卷积层究竟看到了什么。
在TensorFlow中,即使是最简单的直接输出卷积层的方法,网上的讲解也参差不齐,David 9 今天要把可运行的方法告诉大家,以免大家受到误导。
废话少说,最简单的方法在此:
如果你有一个卷积层,我们以Tensorflow自带的cifar-10训练为例子:
with tf.variable_scope('conv1') as scope:
  kernel = _variable_with_weight_decay('weights',
                                       shape=[5, 5, 3, 64],
                                       stddev=5e-2,
                                       wd=0.0)
  conv = tf.nn.conv2d(images, kernel, [1, 1, 1, 1], padding='SAME')
  biases = _variable_on_cpu('biases', [64], tf.constant_initializer(0.0))
  pre_activation = tf.nn.bias_add(conv, biases)
  conv1 = tf.nn.relu(pre_activation, name=scope.name)
  _activation_summary(conv1)
不出所料的话你一定会有以上代码,这是第一层卷积层conv1的TensorFlow流图定义。显然这里conv1对象是卷积层的激活输出。我们要做的就是直接可视化输出。在这个scope中加上如下代码:
  with tf.variable_scope('visualization'):
    # scale weights to [0 1], type is still float
    x_min = tf.reduce_min(kernel)
    x_max = tf.reduce_max(kernel)
    kernel_0_to_1 = (kernel - x_min) / (x_max - x_min)
# to tf.image_summary format [batch_size, height, width, channels]
    kernel_transposed = tf.transpose (kernel_0_to_1, [3, 0, 1, 2])
# this will display random 3 filters from the 64 in conv1
    tf.summary.image('conv1/filters', kernel_transposed, max_outputs=3)
    layer1_image1 = conv1[0:1, :, :, 0:16]
    layer1_image1 = tf.transpose(layer1_image1, perm=[3,1,2,0])
    tf.summary.image("filtered_images_layer1", layer1_image1, max_outputs=16)
即总体变为:
with tf.variable_scope('conv1') as scope:
  kernel = _variable_with_weight_decay('weights',
                                       shape=[5, 5, 3, 64],
                                       stddev=5e-2,
                                       wd=0.0)
  conv = tf.nn.conv2d(images, kernel, [1, 1, 1, 1], padding='SAME')
  biases = _variable_on_cpu('biases', [64], tf.constant_initializer(0.0))
  pre_activation = tf.nn.bias_add(conv, biases)
  conv1 = tf.nn.relu(pre_activation, name=scope.name)
  _activation_summary(conv1)
  with tf.variable_scope('visualization'):
    # scale weights to [0 1], type is still float
    x_min = tf.reduce_min(kernel)
    x_max = tf.reduce_max(kernel)
    kernel_0_to_1 = (kernel - x_min) / (x_max - x_min)
# to tf.image_summary format [batch_size, height, width, channels]
    kernel_transposed = tf.transpose (kernel_0_to_1, [3, 0, 1, 2])
# this will display random 3 filters from the 64 in conv1
    tf.summary.image('conv1/filters', kernel_transposed, max_outputs=3)
    layer1_image1 = conv1[0:1, :, :, 0:16]
    layer1_image1 = tf.transpose(layer1_image1, perm=[3,1,2,0])
    tf.summary.image("filtered_images_layer1", layer1_image1, max_outputs=16)
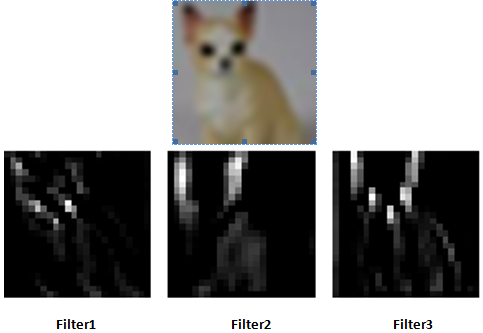
加入的功能是在TensorBoard中随机显示3张卷积核,并且,显示16张卷积后的输出filter通道。
知道讲解的是,这里的tf.transpose()方法,是转置方法。
tf.transpose(layer1_image1, perm=[3,1,2,0])
这句代码表示把第0维和第3维调换,因为图片输出函数
tf.summary.image()
需要输入维度的格式是(batch数,长,宽,彩色通道),而刚才卷积输出得到的是(batch数,长,宽,卷积通道), 现在的彩色通道是应该是空,现在batch数应该是刚才卷积输出的彩色通道数。
总之加了以上visualization 的scope之后,就能实时跑了。亲测可用。输出样例如下:
参考文献:
- http://stackoverflow.com/questions/35759220/how-to-visualize-learned-filters-on-tensorflow
- https://github.com/tensorflow/tensorflow/issues/842
- https://github.com/yosinski/deep-visualization-toolbox
- https://github.com/tensorflow/tensorflow/issues/908
- https://medium.com/@awjuliani/visualizing-neural-network-layer-activation-tensorflow-tutorial-d45f8bf7bbc4
- https://gist.github.com/kukuruza/03731dc494603ceab0c5
本文章属于“David 9的博客”原创,如需转载,请联系微信: david9ml,或邮箱:yanchao727@gmail.com
或直接扫二维码:

The following two tabs change content below.


David 9
邮箱:yanchao727@gmail.com
微信: david9ml
Latest posts by David 9 (see all)
- 修订特征已经变得切实可行, “特征矫正工程”是否会成为潮流? - 27 3 月, 2024
- 量子计算系列#2 : 量子机器学习与量子深度学习补充资料,QML,QeML,QaML - 29 2 月, 2024
- “现象意识”#2:用白盒的视角研究意识和大脑,会是什么景象?微意识,主体感,超心智,意识中层理论 - 16 2 月, 2024
你好,我加了你说的那块代码在原来的训练代码里,然后去打开tensor board,这个好像还要调用log?我以前没做过,最后网页端那里image部分什么都没有,只有graph有东西?
打开tensorboard的目录需要设置对,应该不只是graph有东西,训练样本会实时看到。
如果还有问题可以联系微信:david9ml
你好,请问除了在训练代码上做这些修改之外,还需要什么其他操作吗?还是没有log生成。
应该不用了,基于这个代码改应该就可以:https://github.com/tensorflow/models/tree/master/tutorials/image/cifar10